The Brews
Up to Brew 8, this was kept in a notebook. After that brew, I used Brewfather to track recipes, inventory, batches and tasting notes.
More detail on Brews 1-4 are in the post Documenting a Journey.
Batches 6-8 were small batch experiments with the resulting batch discarded.
Batches 9-13 are discussed in more detail in Journey Pt 2
Batches 14 to 18 are described in Journey Pt 3
I plan to add to the batch list here up to the point where I do the full brew of the home grown hop and barley Grandfather Strong Ale.
These summaries are intended to give an overview of the viewing but the things I think are more interesting are contained in the Journey articles. There you will see the detail of my experiments and learning. The brews/batches are the outcome of the steps on the journey … however the journey is the interesting bit
Batch 1. First Try
My objective was to learn to ferment and use the basic equipment. I expected to better understand how far I needed to go to properly brew beer. Expectation was that I would need 3 months of trial and error to work this out.
Details
The first batch was simply a test to practice the process. Equipment was a barrel fermenter and using a kit bundled in with the fermenter, bottles etc. I discovered that you really need good sized equipment, especially for the boil. The supplied yeast produced a very weak ferment after two days. A second packet (probably fresh). This brew went down the sink. It was never going to be drunk.
Batch 2. Aiming to drink this
My objective was to build on my experience of the first fermentation trial and learn more about what I might need for equipment and experience.
Details
The second brew was an extract brew again with the same ingredients plus what was needed for bottling. I used a larger pot to boil the wort and the barrel fermenter. I was more careful with sanitising and cleaning. The bottling exercise was messy for the first try and better after that. The result tasted rather yeasty and not that great out of the fermenter. I bottled via the tube supplied and found that there was a lot of sediment going through.
I used a fresh packet of Safale 04 yeast that worked better than the “kit yeast” in the previous batch.
After three weeks of conditioning and with 5g of dextrose per bottle the result was fairly drinkable. I took a bottle to the Canberra Brewers meeting and nobody died. I did get a wealth of useful tips for improvement.
Batch 3. Improving ingredients and equipment
My objective was to improve ingredients and equipment. This was a big step up in the process and my learning. I knew enough to understand the need for consistency and the need to avoid contact with air after fermentation. Again nobody died..
Details
This brew used new equipment for the boil. A larger pot and some measuring equipment. I changed the fermenter to a Fermentasaurus with the pressure kit. This offered the prospect of a more controlled fermentation and better protection from air/oxygen into the fermenter. It also allowed me to monitor internal temperature a bit better with an IR thermomemter.
I bought more bottles. Grolsch type this time. I used two tins of dark liquid malt extract that is a reasonably close match to what I am aiming to make – a Porter style. I chose dry malt extract with “extra body” ie unfermentable malt sugars.
The result was better and I used a Danstar Nottingham yeast that I properly hydrated and “started” with some wort added before pitching. The ferment started overnight and completed in 5 days. This was in late April and the temperature was stable and nearly ideal for fermentation. All I had to do to keep the temperature within 3 degrees between day and night was shut the laundry door and window.
Batch 4. Serious about the chemistry
My objective was to apply my knowledge of chemistry to the art of brewing. This was a brew where I was mainly aiming to learn and get the chemistry right. The result was surprisingly good. Not only did nobody die but some people liked the ale enough to have a second taste.
Details
Batch 4 was started straight after I attended my first Canberra Brewers meeting. I still used extract but also added steeped crystal malt and dark malt grains. I also used some Fuggles and Goldings hop pellets in sealed but not chilled packets. The Liquid extract I used was unhopped dark coloured and I used a dry malt extract with 20% unfermentable malts.
I setup a home made spunding valve and temperature monitoring for the Fermentasaurus because it was now getting colder and the temperature fluctuations large.
I did some research and found that the style I should be looking for was something similar to the Fullers ESB and towards a London Porter for the 1850s. I used the Safale 04 yeast again intending to standardise on it. The result was quite good and samples I took to Canberra Brewers were considered much better than previous. Again nobody died. Not even needing medical treatment.
Batch 5. All Grain and science
My objective was to further develop from Batch #4 and attempt to do an all grain mash. That is to do proper brewing rather than just fermenting well. I also wanted to do filtering to remove yeastiness. I learned a lot
Batch 5 was started 2 weeks after Batch 4.
Details
I setup a home made spunding valve and temperature monitoring for the Fermentasaurus because it was now getting colder and the temperature fluctuations large.
I did some research and found that the style I should be looking for was something similar to the Fullers ESB and towards a London Porter for the 1850s. I used the Safale 04 yeast again intending to standardise on it. The result was quite good and samples I took to Canberra Brewers were considered much better than previous. Again nobody died. Not even needing medical treatment.
Batches 6 and 7. Experiments with yeast and measurements
I used half sized batches to avoid wastage of ingredients to see the differences in yeast performance and practice with the temperature control on my new fermenter. Quality of the finished product was not the priority. The experiments are documented in the Journey Part 2
Batch 8. First Kolsch
Summary
I used a recipe obtained from the BYO website and substituted Nottingham yeast for the proper Koln yeast style. It was an experiment more than anything. I therefore used a Pilsner extract can and additional Munich malt. Hops were Hallertau and Perle. It did not taste like a proper Kolsch – lacking complex flavours – but was clean and worked ok. I did this as a half batch to not waste as much ingredient.
Batch 8. First Kolsch
The objective was to trial a new style so that I could learn more techniques and do so with a style sensitive to mistakes in the process. Therefore German Ale or Kolsch.
Summary
I used a recipe obtained from the BYO website and substituted Nottingham yeast for the proper Koln yeast style. It was an experiment more than anything. I therefore used a Pilsner extract can and additional Munich malt. Hops were Hallertau and Perle. It did not taste like a proper Kolsch – lacking complex flavours – but was clean and worked ok. I did this as a half batch to not waste as much ingredient.
Details
AS an experiment this was a very good one. I kept 4 bottles of this to condition/mature but the real value was in learning how to best use the new fermenter – a Grainfather Conical. Temperature control is the key feature of the fermenter and it worked well.
Batch 9. A good Kolsch
Summary
This was a good ale.
Batch 10. Strong Ale/ESB
Summary
No taste testing yet. I am giving it 6 months of conditioning before tasting.
Batch 11 was a test of the new Grainfather mashing.
Batch 12. Strong/Old English Ale
Summary
Tasting is due in May 2019. The long term fermentation under pressure will be the key learning from this batch. The process itself was a lot messy but can be improved with a pressure transfer kit that I have on order. I made my one pressure transfer attached to the outlet valve of the conical fermenter and it worked but made a mess and required lying on the floor to attach and detach the tubing. Also too much wastage in the tubing. The mashing in the new Grainfather worked very well with stepped mash automated. Integrated with the Brewfather app this was a highlight.
Batch 12. Strong/Old English Ale
This batch was a variation to the signature ale with a very long conditioning session of 9 months in a secondary (Fermentasaurus under pressure).
Summary
Tasting is due in May 2019. The long term fermentation under pressure will be the key learning from this batch. The process itself was a lot messy but can be improved with a pressure transfer kit that I have on order. I made my one pressure transfer attached to the outlet valve of the conical fermenter and it worked but made a mess and required lying on the floor to attach and detach the tubing. Also too much wastage in the tubing. The mashing in the new Grainfather worked very well with stepped mash automated. Integrated with the Brewfather app this was a highlight.
Batch 13. American Pale Ale
Summary
Outcome was bad. Tasteless and bland. Most of the reason seems to be a leaking keg. It was a secondhand keg and after the primary and secondary ferments, I transferred to the keg under pressure. I topped the keg up from the CO2 cylinder and then set it aside for conditioning for three weeks. I found that there was no pressure in the keg. I then changed the seal on the lid of the keg and that seemed to do the job. Repressurised and took it to Canberra Brewers. Response- underwhelming. All hop aroma and most of the flavour was gone. Experience!
Batch 13. American Pale Ale
This batch was intended to be a new style and a test of new brewing technique. The newest thing I wanted to add was to do a primary, secondary and in key conditioning ferment.
Summary
Outcome was bad. Tasteless and bland. Most of the reason seems to be a leaking keg. It was a secondhand keg and after the primary and secondary ferments, I transferred to the keg under pressure. I topped the keg up from the CO2 cylinder and then set it aside for conditioning for three weeks. I found that there was no pressure in the keg. I then changed the seal on the lid of the keg and that seemed to do the job. Repressurised and took it to Canberra Brewers. Response- underwhelming. All hop aroma and most of the flavour was gone. Experience!
Batch 14 was not brewed
Batch 14. German Brown ale
Summary
This was a good ale. I liked it and have it in a keg conditioning for 9 months. The process was the same as for Batch 9 and variations in ingredients. No secondary fermentation in the Fermentasaurus because I was using both of them.
Batch 14. German Brown ale
The aim of this exercise was to do an Altbier style and broaden my experience of styles.
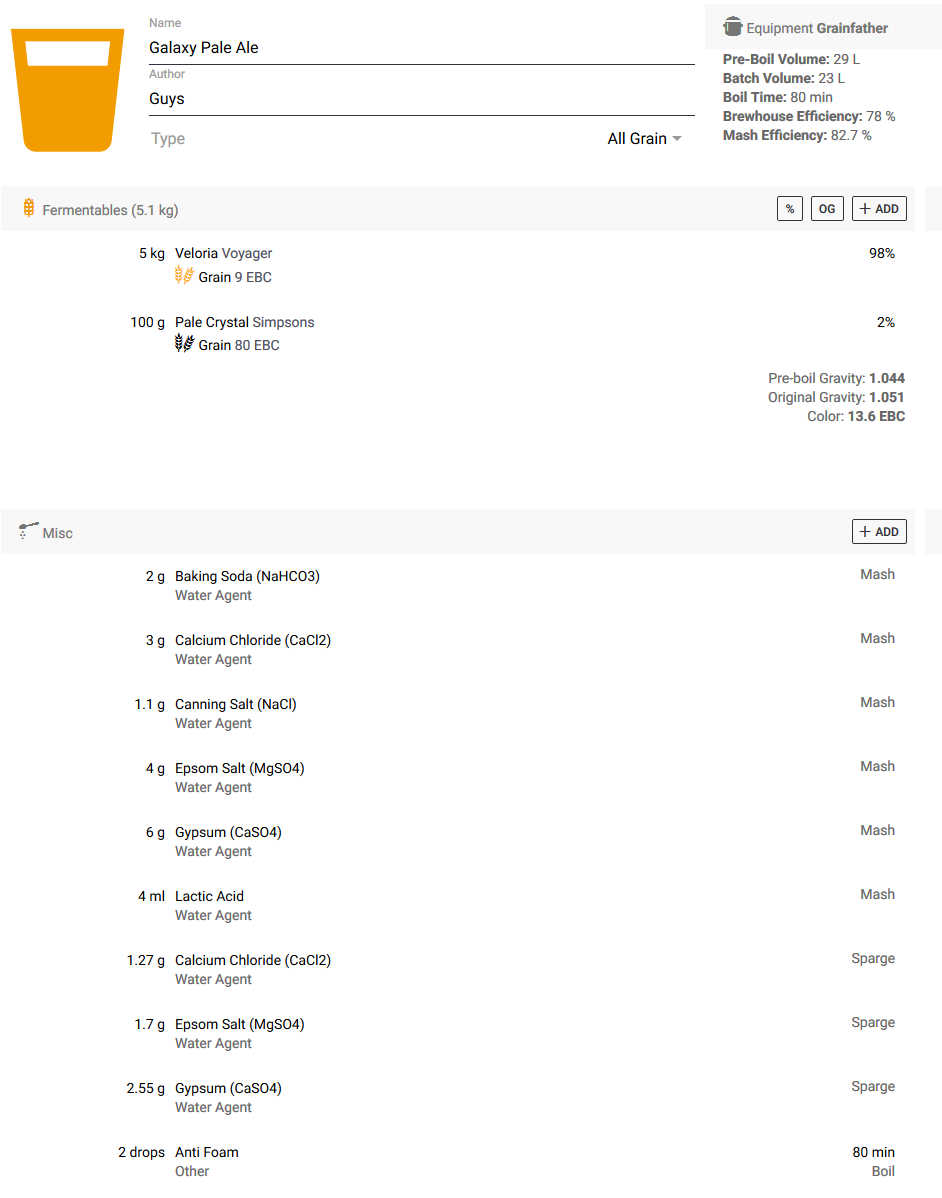
Batch 16. Galaxy Pale Ale
Summary
I was very happy with this one. I did no dry hopping and no secondary in the Fermentasaurus so I did not learn as much as I could have. However, the simpler process and ingredients list seemed to work. The taste test was reasonably well received. Bitterness and malt were good. Hop flavour and aroma were lacking. This was in line with my objective. One packet of BRY-97 and one of Safale 05 yeast this time to make sure there was plenty of yeast activity.
I may look to some hop additives to adjust this batch … stay tuned
Batch 16. Galaxy Pale Ale
After Batch 13, I wanted to revisit the style and see if I could do better. This time using a simplified process and a new keg. Simplified ingredients by using only Galaxy hops.
Summary
I was very happy with this one. I did no dry hopping and no secondary in the Fermentasaurus so I did not learn as much as I could have. However, the simpler process and ingredients list seemed to work. The taste test was reasonably well received. Bitterness and malt were good. Hop flavour and aroma were lacking. This was in line with my objective. One packet of BRY-97 and one of Safale 05 yeast this time to make sure there was plenty of yeast activity.
I may look to some hop additives to adjust this batch … stay tuned
New information and tracking
From Batch 17 on I am tracking the fermentation in detail. I now have two Tilts a black and a red. The red works better in the stainless conical fermenter and the black one works well in the Fermentasaurus. Red = Primary ferment and Black = secondary. I also have a Plaato device that measures gas production in the primary. When it integrates with Brewfather I will add those graphs too.
Batch 17. Kolschy APA
Summary
Very happy with this. Taste test at Canberra Brewers in April was very well received. The somewhat unusual hop combination created interest. I used two packets of BRY-97 and did all the fermentation stages in the temperature controlled conical fermenter. The glycol cooler worked overtime and kept temperatures within a degree of the target.
Batch 17. Kolschy APA
The objective of this batch was to correct for the lack of hop flavour and aroma. It was a January brew in near 40 degree heat. I decided to use the German Ale hops, Hallertau and Perle with Cascade to finish off as a dry hop. Unusual but worth a try.
Summary
Very happy with this. Taste test at Canberra Brewers in April was very well received. The somewhat unusual hop combination created interest. I used two packets of BRY-97 and did all the fermentation stages in the temperature controlled conical fermenter. The glycol cooler worked overtime and kept temperatures within a degree of the target.

Batch 18. Cascade APA with Citra
Summary
First taste on 6 April was not too bad aroma and flavour are there. A few esters to clean up with more conditioning – I tasted at 12 degrees so cooling it will help. A bit cloudy from the first pour but that should settle down. The ferment was over 13 days and then transferred direct to a keg. Dry hopping was done on the 10th day in the conical fermenter and with that I added some additional malt extract to restart fermentation and thus clean up any oxygen. We will see how that worked.
Batch 18. Cascade APA with Citra
The aim here was to do a more authentic APA and be thorough in my preparation and brew process.
Summary
First taste on 6 April was not too bad aroma and flavour are there. A few esters to clean up with more conditioning – I tasted at 12 degrees so cooling it will help. A bit cloudy from the first pour but that should settle down. The ferment was over 13 days and then transferred direct to a keg. Dry hopping was done on the 10th day in the conical fermenter and with that I added some additional malt extract to restart fermentation and thus clean up any oxygen. We will see how that worked.